|
Graduate Record Examination or GRE is a standardized test that is an admissions requirement for most graduate schools in the United States. Now, many schools around the world also accept GRE scores for their graduate school admissions. If you have ever researched about it, you might have come across this notion that GRE is a very tough exam. I don't feel so. According to me, GRE is an easy exam but indeed a mentally exhaustive experience. It is the test of your mental state on the day of exam. No matter how prepared you are, if you panic on the day of the exam, nothing will save you. In this post, I'll guide you on how to prepare for the exam. In my opinion, it is better to enroll for a GRE coaching class because they provide you with up to date material which will benefit you. But for those, who either cannot afford or don't want to enroll for such classes, this post will try its best to guide you through the dark. Let's get started. What to expect: GRE has 3 sections:
Each verbal section will have 20 questions and they are to be answered in 30 mins. Similarly, each quantitative section will also have 20 questions, but they're to be answered in 35 mins. Verbal Reasoning score: On a 130–170 score scale, in 1-point increments Quantitative Reasoning score: On a 130–170 score scale, in 1-point increments Analytical Writing score: On a 0–6 score scale, in half-point increments GRE total score: On a 260–340 score scale 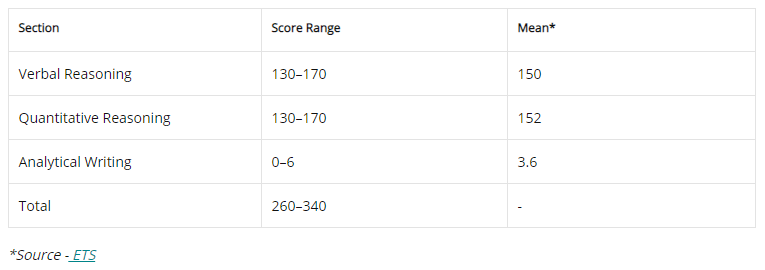 Your GRE score will remain valid for 5 years from the date of the exam. It will be available in your account on the GRE website. They will be sent to the universities of your choice within six weeks of your test date. You will receive an email from ETS that your official GRE result is available in your account.
How to prepare:
Tips: A) Issue Essay:
Introduction: Restate the issue. But don't repeat. Eg: The statement claims..... The statement contends... Body: Add relevant examples. Ordering of the paragraphs are important. Also mention the limitations. Don't spend too much time regarding a single point. Conclusion: Resummarize your position. Eg. In sum, .... To sum up,.... B) Argument Essay:
Words for support: also, again, as well as, besides, coupled with, furthermore, in addition to, likewise, moreover, similarily, first..second..third, but also. Words for opposition: In spite of, despite, contrast, conversely, instead, likewise, on one hand... on the other hand, on the contrary, yet, but, however, nevertheless, in contrast. Words for conclusion: accordingly, as a result of, consequently, for this reason, for this purpose, hence, so then, subsequently, therefore, thereupon. Introduction: Eg: This memo/argument recommends....Careful scrutiny of the memo reveals several unproven assumptions, which render it unconvincing. This argument is problematic in several critical respects. Conclusion: Eg: In sum, the manager's evidence accomplishes little towards supporting the memo. In conslusion, the argument is unconvincing as it stands. to strengthen.... To better evaluate the argument, we would require more information....
Then move on to Word Lists. Before GRE make sure you have completed the book and atleast one Word List that is Manhattan 1000. This is the basic foundation. GRE Verbal has 3 parts: Sentence Completion (SC), Text Completion (TC) and Reading Comprehension (RC). Complete RC, SC, TC from Manhattan 5LB. Also do RCs from Princeton 1014.
NOTE: Due to copyrights issue, I will not be able to post links to the materials mentioned above. You should be able to find these materials online quite easily by doing simple Google search. If you have difficulty finding any material, leave a comment below or email me, I'll send the material to you. PS: 1) If you want to try out your GRE skills, go to MajorTests. They have a couple of GRE-level quizzes for Verbal and Quantitative section. Try them out. 2) Another great resource to refer is Magoosh. A site dedicated to providing the most up-to-date college test preparation resources for exams - including the GRE. Best of luck for your exam and let me know about any errors or doubts you may have in the comments section below.
0 Comments
Remote communication between applications using RMI (Remote Method Invocation) in Java - Tutorial18/5/2018
Remote Method Invocation is a Java API that allows for objects to invoke methods from another object running in the same or different JVM. It is used to create distributed applications in Java.
To be a distributed application, an application needs to be able to:
RMI allows applications to become distributed by achieving the above. RMI uses stubs and skeletons to communicate with remote objects. A stub, is an object used for client-side communication whereas the skeleton is is used for server-side communication. Let's see how to create distributed applications using RMI. Disclaimer: I do not own any content. The following code is an amalgamation of different codes available on numerous websites that include: StackOverflow, TutorialsPoint, etc. Prerequisite: The only knowledge required is a thorough knowledge of Java. Installations: None, except Java (obviously). Procedure: In this tutorial I will show you the implementation of RMI by requesting a function from the server that returns the value of Pi (π) accurate upto 12 digits. In order to create a distributed application we need to create the following files:
import java.rmi.*; public interface MathConstants extends Remote { public double pi() throws RemoteException; }
import java.rmi.*; import java.rmi.server.UnicastRemoteObject; public class MathConstantsImpl extends UnicastRemoteObject implements MathConstants { MathConstantsImpl() throws RemoteException { super(); } public double pi() { return 3.141592653589; } }
import java.rmi.Naming; public class Client { public static void main(String args[]){ try{ int port = 7100; String lookup_url="rmi://localhost:"+port+"/Constants"; MathConstants con = (MathConstants)Naming.lookup(lookup_url); System.out.println("Area of a circle with radius 3 is: "+ (con.pi()*3*3)); }catch(Exception e){ System.out.println("Error: "+e); } } }
import java.rmi.*; import java.rmi.registry.LocateRegistry; import java.rmi.registry.Registry; public class Server { public static void main(String args[]) throws RemoteException{ try{ int port = 7100; startRegistry(port); MathConstantsImpl con = new MathConstantsImpl(); String url = "rmi://localhost:"+port+"/Constants"; Naming.rebind(url,con); System.out.println("Server ready."); }catch(Exception e){ System.out.println("Error: "+e); } } private static void startRegistry(int port) throws RemoteException { try{ Registry registry = LocateRegistry.getRegistry(port); registry.list(); System.out.println("Found Registry"); }catch(Exception e){ System.out.println("Registry not found. Creating Registry...."); LocateRegistry.createRegistry(port); System.out.println("New Registry Created"); } } }
Try this out yourself in the meantime and let me know about any errors or doubts you may have in the comments section below.
We've all used Google Maps to find the shortest distance, route between two locations and the time required to get there. But we've used Google Maps Mobile Application or Website for it. Not anymore. You can use Google Maps API to provide this functionality in your website as well.
Disclaimer: I do not own any content. All credit goes to developers at Google Maps and the following code belongs to the documentation provided by Google Maps for their APIs. This blog only provides an easy understanding of how to use Google Maps APIs for your own use. Let's begin. Prerequisite: Basic understanding of HTML, CSS and JavaScript. Installations: Does a good Internet connection qualify as an installation? If yes, then yes. Else, no. :p Procedure: Before starting to use Google Maps API, every user needs a unique key for that API to work. This key can be easily generated. To generate your own key, go to Get API Key. Follow the instructions and your key, which would look something like this: 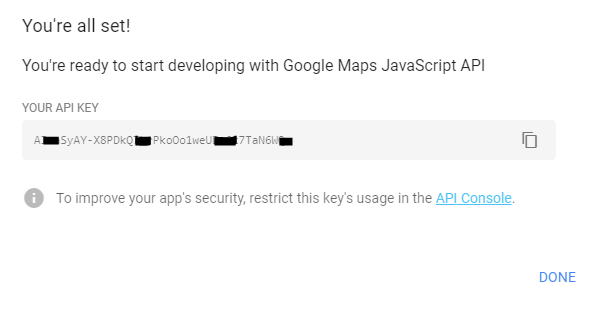
You'll have to enter this key in the code that we're going to use.
Let's see the code now. I won't be posting the entire code here on the website because it becomes too crowded and hard to explain. So you can access the entire code here from my Blog-GitHub repository.
So let's look at the code now. The following code is the API Google Maps has provided for developers to use in their websites. Enter the key you generated in the blank space (shown by purple colored-text).
<script type="text/javascript" src="https://maps.google.com/maps/api/js?api=YOUR API KEY&sensor=false"></script> Moving on, function initialize() is called every time the body of the HTML is generated. It is used to initialize all variables, create objects of functions, etc that are going to be used while calculating time and distance. Once you run your .html file, a map will show on your screen showing the city of Mumbai, because I have set the coordinates of Mumbai. If you want a particular city to show up on initialization, search the coordinates of the city on Google and put them in the following line of code inside the initialize() function: var city = new google.maps.LatLng(19.0760, 72.8777); I'll show you an example. If you want the city of Paris to show up on initialization, search: 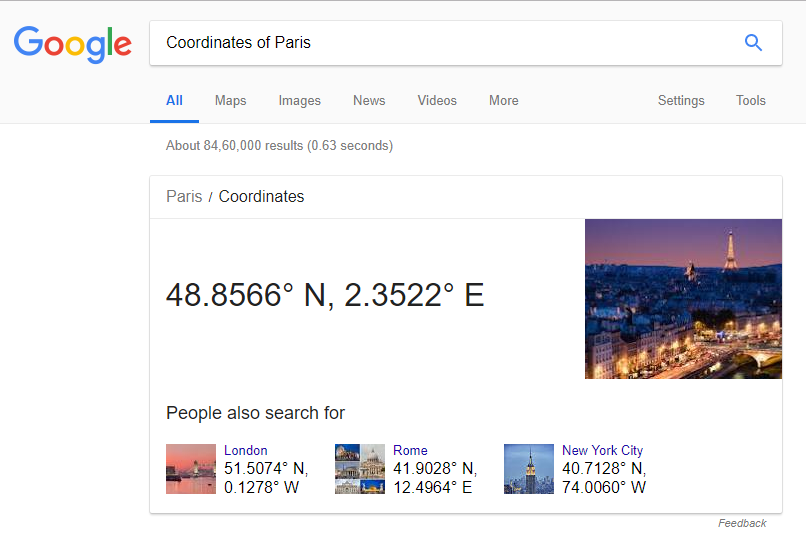
The coordinates for Paris are 48.8566 N and 2.3522 W. So, modify the code accordingly:
var city = new google.maps.LatLng(48.8566, 2.3522); And voila! Paris it is. 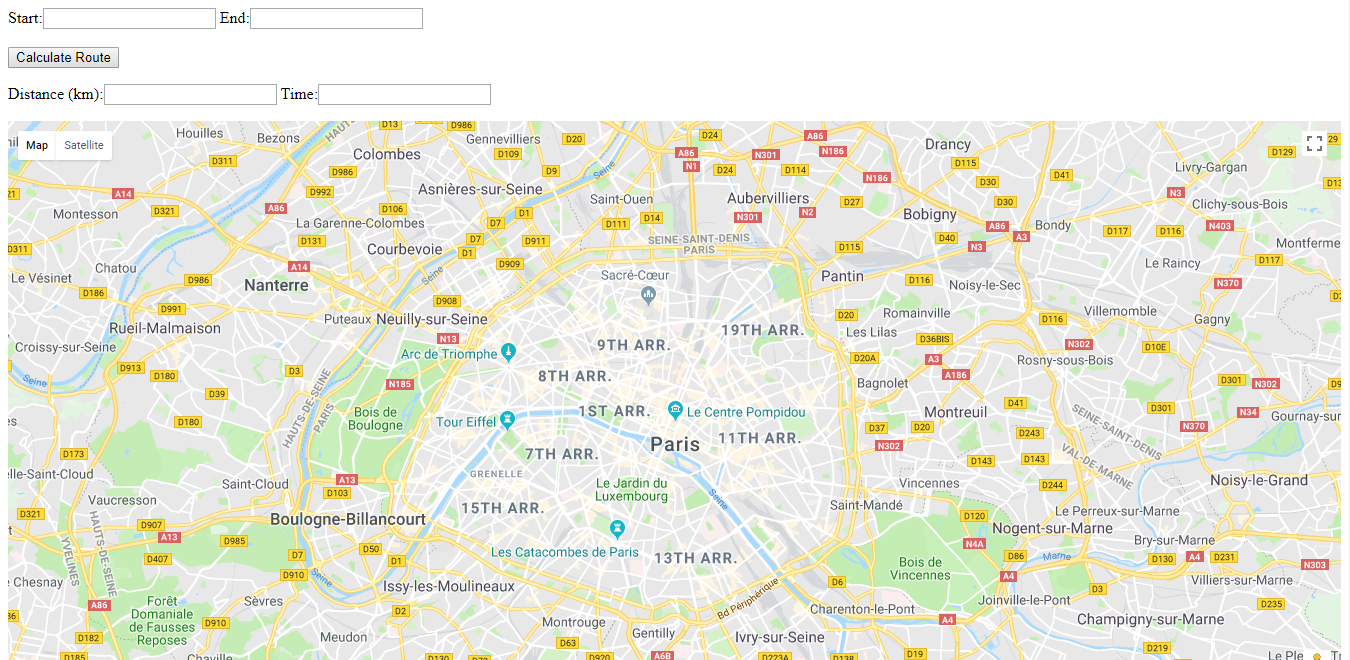
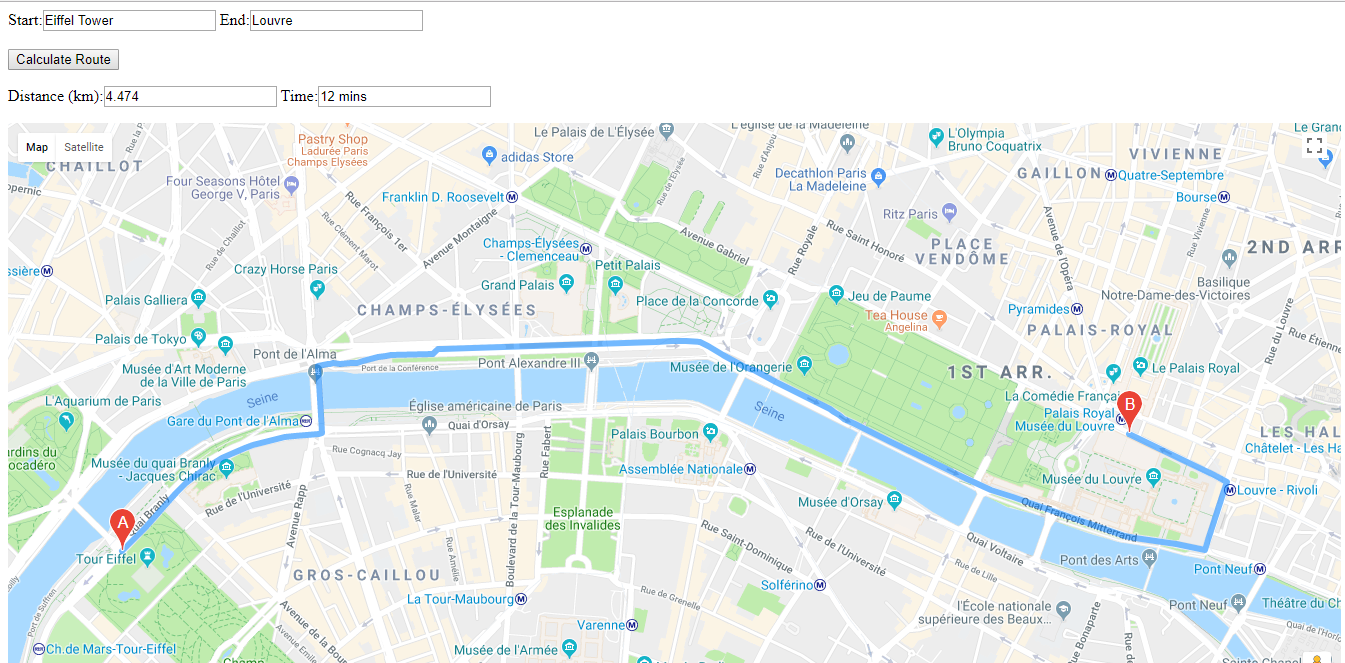
The main function in the code, is calcRoute(). It requests and receives the distance and time between the two specified points. Variable request defines the starting location, ending location and the mode of transport.
For driving, use google.maps.DirectionsTravelMode.DRIVING For walking, use google.maps.DirectionsTravelMode.WALKING For bicycling, use google.maps.DirectionsTravelMode.BICYCLING For transit, use google.maps.DirectionsTravelMode.TRANSIT directionsService.route() sends a request to Google Maps servers, and awaits a response. response.routes[0].legs[0].distance.value/1000 converts the received distance into kilometers. That's the main portion of the code. Rest of the code is just basic HTML, CSS or JavaScript syntax. Let's see how it works:
Try this out yourself and let me know about any errors or doubts you may have in the comments section below.
Sending an email is quite simple if you're using a web-based email service provider like Gmail or Rediffmail (Who am I even kidding :p). Sending an email using pure Java may not be as easy but it is not rocket science either.
Let me show you how. Disclaimer: I do not own any content. The following code is an amalgamation of different codes available on numerous websites that include: StackOverflow, TutorialsPoint, NetBeans Community, etc. Prerequisite: The only prerequisite required is a thorough knowledge of Java. Installations:
Procedure:
import java.util.Properties; import javax.mail.Message; import javax.mail.MessagingException; import javax.mail.PasswordAuthentication; import javax.mail.Session; import javax.mail.Transport; import javax.mail.internet.InternetAddress; import javax.mail.internet.MimeMessage; java.util.Properties is a normal library that'll be available if you have Java installed. Rest shall only work if you've downloaded the two JAR files - mail.jar and activation.jar. If you're using NetBeans, then add the JARS in the library portion (circled portion in the screenshot). It should look something like this. Don't worry about any errors that maybe coming right now. 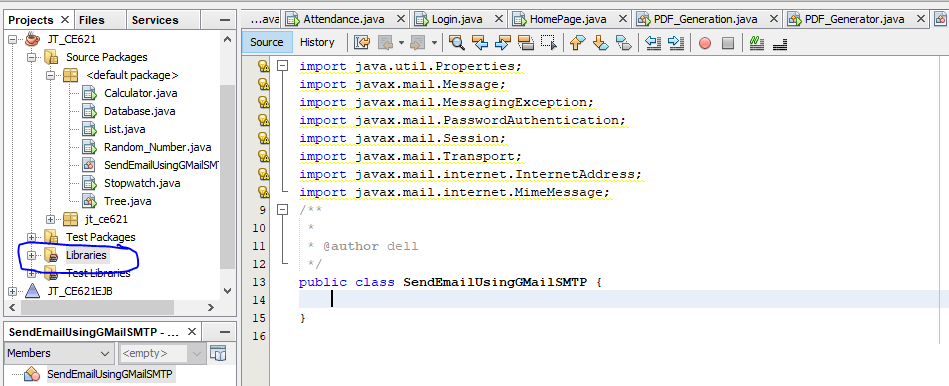
public static void main(String[] args){ }
// Recipient's email ID needs to be mentioned. String to = "[email protected]"; // Sender's email ID needs to be mentioned String from = "YourEmailID@gmail.com"; final String username = "[email protected]"; final String password = "YourAccountPassword"; // Assuming you are sending email through relay.jangosmtp.net String host = "smtp.gmail.com";
Properties props = new Properties(); props.put("mail.smtp.auth", "true"); props.put("mail.smtp.starttls.enable", "true"); props.put("mail.smtp.host", host); props.put("mail.smtp.port", "587");
Session session = Session.getInstance(props, new javax.mail.Authenticator() { protected PasswordAuthentication getPasswordAuthentication() { return new PasswordAuthentication(username, password); } }); So far your code should look like this: 
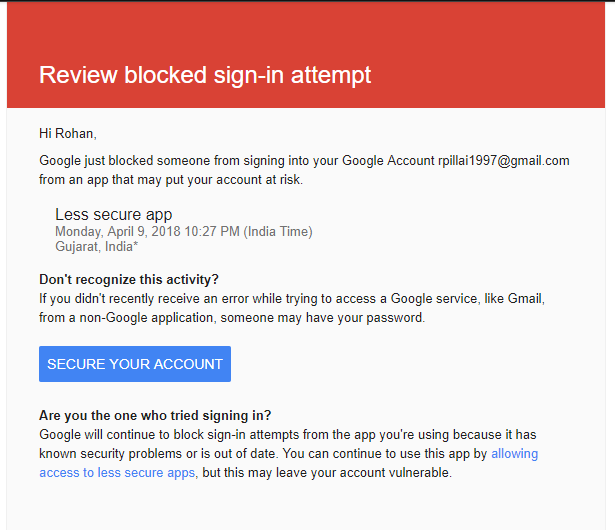
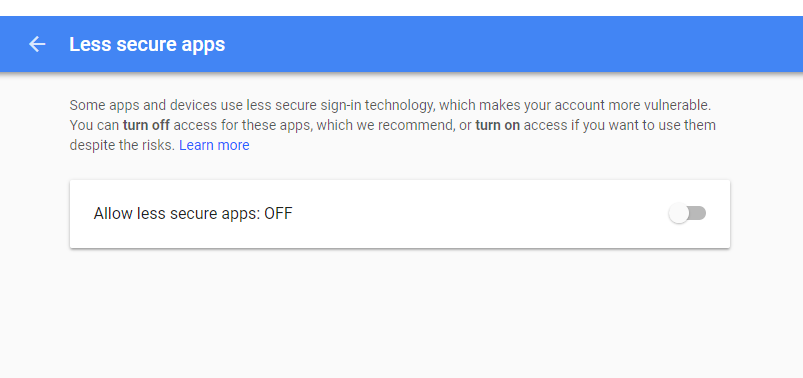
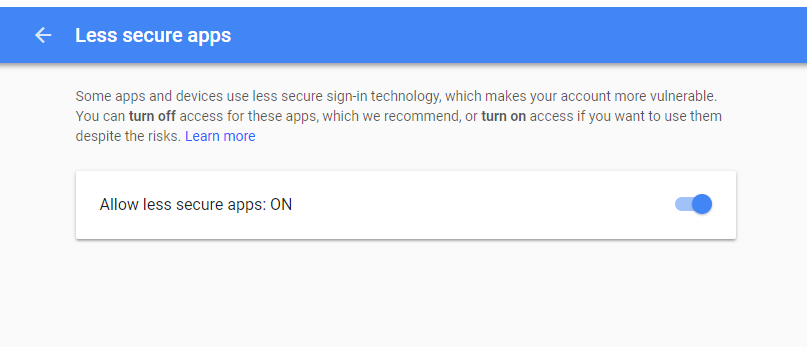
try{ // Create a default MimeMessage object. Message message = new MimeMessage(session); // Set From: header field of the header. message.setFrom(new InternetAddress(from)); // Set To: header field of the header. message.setRecipientsMessage.RecipientType.TO, InternetAddress.parse(to)); // Set Subject: header field message.setSubject("Testing Subject"); // Now set the actual message message.setText("Hello, this is sample for to check send " + "email using JavaMailAPI "); // Send message Transport.send(message); System.out.println("Sent message successfully...."); }catch (MessagingException e){ throw new RuntimeException(e); } The coding portion is complete. You can compile the files now. If you've made the file in Notepad, don't forget to include the JARS in the classpath during compilation in cmd. //Compiling the file javac -cp .;C:\jaf-1.1.1\javax.mail.jar;C:\jaf-1.1.1\activation.jar SendEmailUsingGMailSMTP.java //Running the File java -cp .;C:\jaf-1.1.1\javax.mail.jar;C:\jaf-1.1.1\activation.jar SendEmailUsingGMailSMTP If you're using NetBeans, just compile the project and run it using Shift + F6. NOTE: If you compile and run your code, it will show a good number of errors. This is because Google does not allow less secure apps to access itself. You will need to change this. There are two ways to do it,
Done.
Now run and compile your file once again, and Eureka! you have successfully sent an email using only Java. 
This was just a basic tutorial to send a simple email using Java.
NOTE: You can access the entire code here. mail.jar has many more methods that allow you to send images, tables etc in email. I'll make an Advanced Tutorial later some time. Try this out yourself in the meantime and let me know about any errors or doubts you may have in the comments section below.
We have all created PDFs of documents and excel sheets using inbuilt PDF converter or online converters, but have you ever tried creating a PDF using pure Java?
Let me show you how. Disclaimer: This is a tutorial of creating PDF using Java with the help of iText 5. I do not own any content. All credit goes to developers at iText and fellow helpers at StackOverflow. Prerequisites: The only prerequisite required here is thorough knowledge of Java. Installations:
Procedure:
import com.itextpdf.text.Document; import com.itextpdf.text.DocumentException; import com.itextpdf.text.Paragraph; import com.itextpdf.text.pdf.PdfWriter; import java.io.FileNotFoundException; import java.io.FileOutputStream; These are the library files required to run the methods. These librabry files look different than the usual library files like java.lang.Math or javax.servlet because this is a 3rd party JAR and not the usual Java JAR. The page should look like this. Don't worry about any errors that maybe coming (if any). 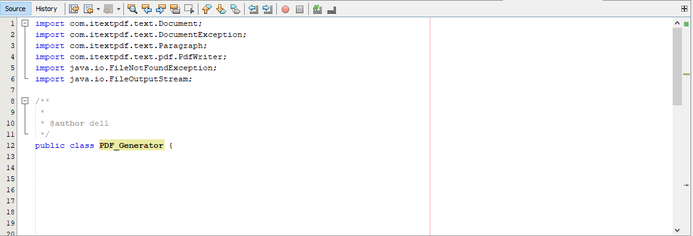

public static void main(String args[]) throws DocumentException{ Document document = new Document(); try{ PdfWriter writer = PdfWriter.getInstance(document, new FileOutputStream("C:\\Users\\dell\\Desktop\\Attendance.pdf")); document.open(); document.add(new Paragraph("A Hello World PDF document.")); document.close(); writer.close(); }catch(DocumentException | FileNotFoundException e){ System.out.println("Error: "+e); } } First we have created the main function which throws the DocumentException error in order to handle any unexpected error that might come up. The first statement Document document = new Document(); creates an object document of the Document class. The next code has to be written in a try...catch block because any error can come up while creating a PDF and we don't want NetBeans to display that error in an erroneous fashion. Next, we create an object of PDFWriter while specifying the document object we created along with the path of the location where we want to save our PDF. document.open() opens the object document for creation. document.add(new Paragraph("A Hello World PDF document.") is used to write the text specified in Paragraph into the PDF. document.close() and writer.close() closes the objects. It is good coding etiquette to close objects after their use has been fulfilled in order to minimize errors during actual testing of the program. NOTE: iText 5 and iText 7 are completely different versions and different syntax has to be used for both. This tutorial is for creating a PDF using iText 5. I will write another tutorial for creating a PDF using iText 7 some other time. Do not mix the code of iText 7 while using iText 5 and vice-versa. I made the same error while learning and StackOverflow taught me the difference between the two. 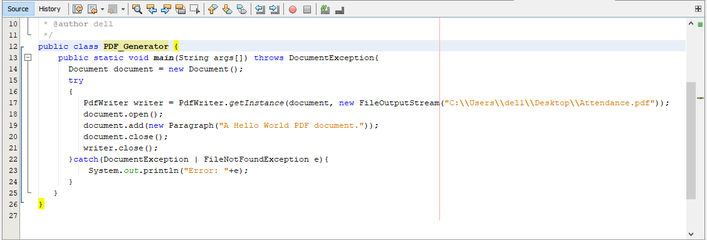
Font boldFont = new Font(Font.FontFamily.TIMES_ROMAN, 18, Font.BOLD); You can change the font of the text to any font you like. The entire list of fonts is available here. To use this, just add the object boldFont inside Paragraph, like this: 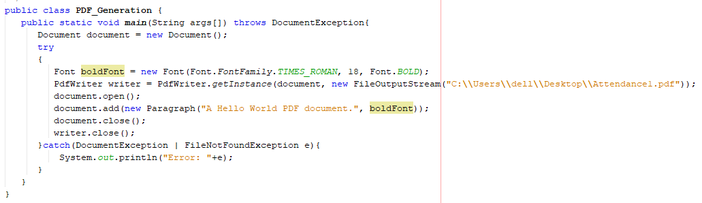
That's it. An easy way to create PDFs using pure Java.
NOTE: You can access the entire code here. Try it out yourself and let me know about any errors or doubts you may have in the comments section below.
There are lots of ways of creating a Login form by using Servlets or PHP or JSP, etc. Another such way is using Struts 2.0 framework. The main purpose of creating this tutorial was to demonstrate a clear way of using Struts 2 as many websites have still not updated their blogs and show demonstration using Struts 1.3.x only, which is a bit different from Struts 2.
NOTE: This tutorial is for creating a simple login form using Struts 2 in NetBeans only. Disclaimer: I do not own any content. The following procedure is an amalgamation of different procedures and codes available on the Internet such as: StackOverflow, JavaTPoint, Java4s, videos on YouTube, etc. Let's begin. Prerequisite:
Installations:
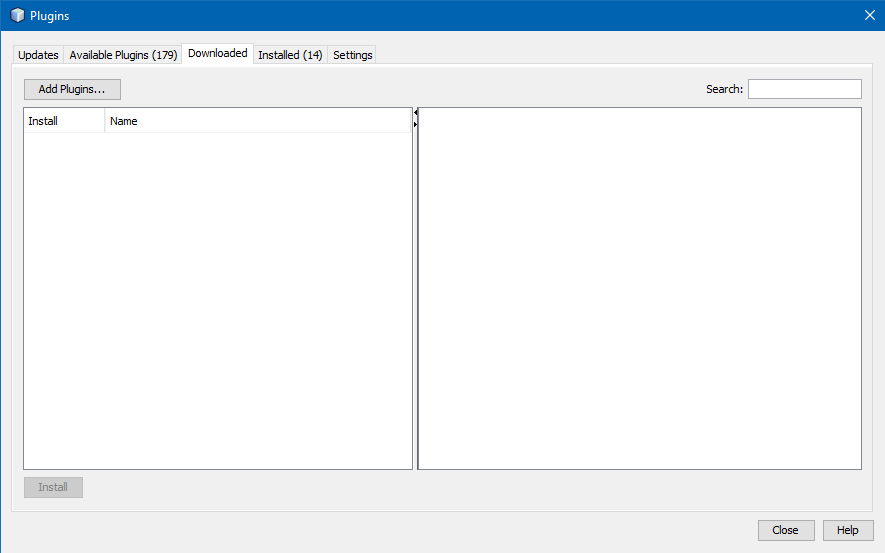
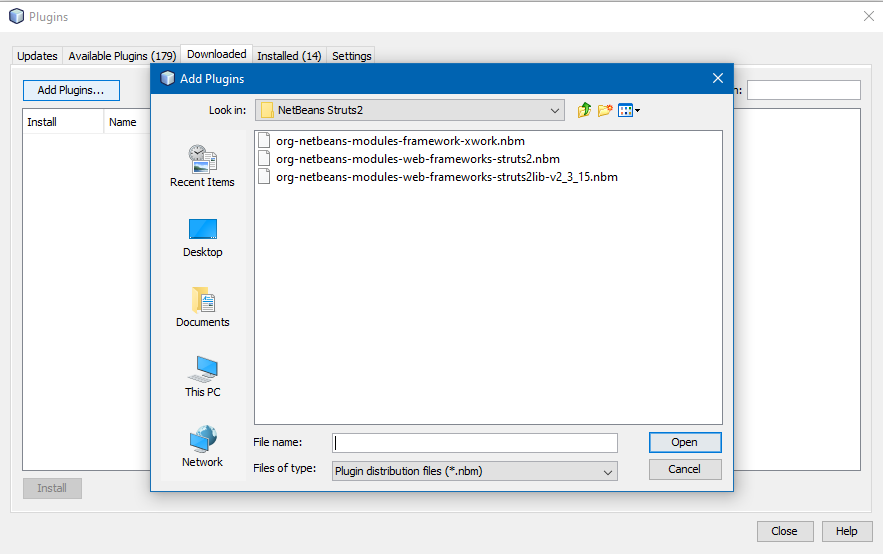
If you've never installed Struts 2, don't worry. Just follow the below procedure:
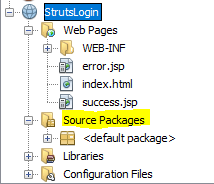
Procedure: To create a login form using Struts 2, we will be creating the following 4 files:
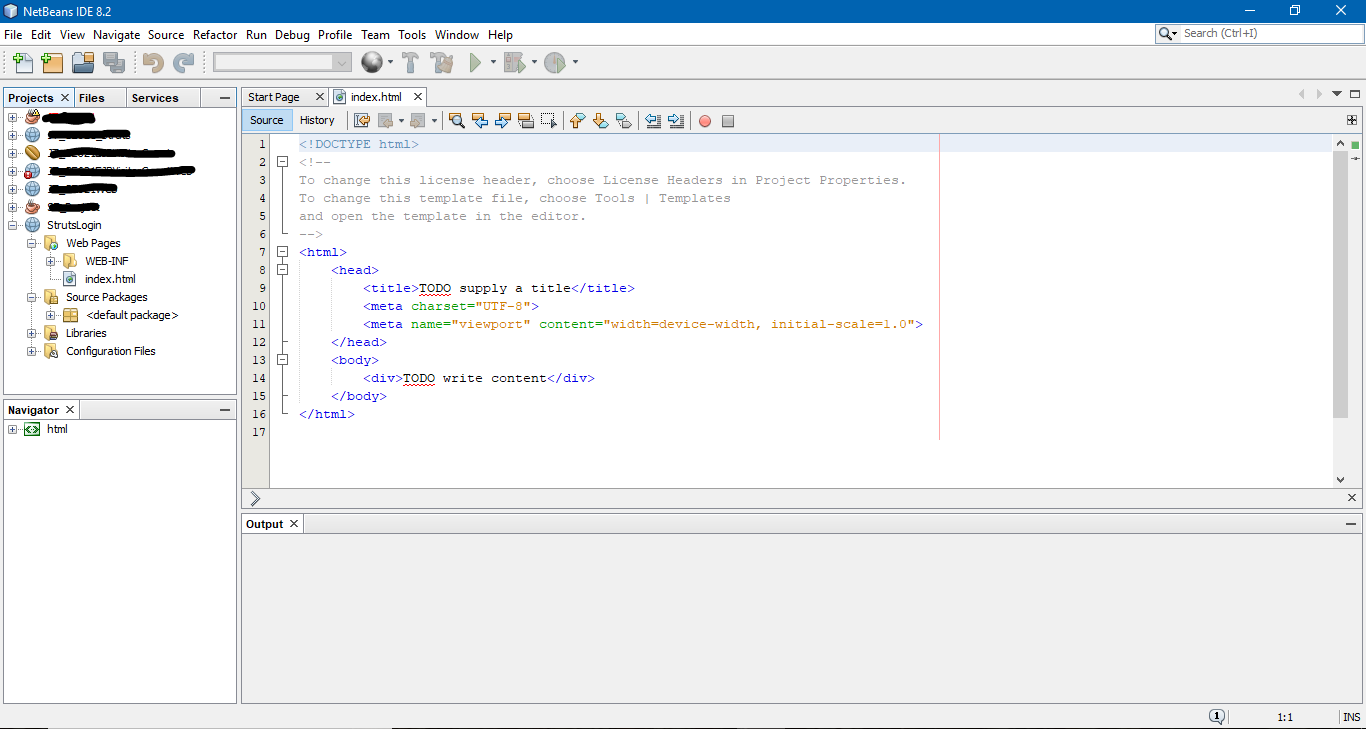
<html> <head> <title>Login using Struts 2</title> <meta charset="UTF-8"> <meta name="viewport" content="width=device-width, initial-scale=1.0"> </head> <body> <form action="login" method="post"> Username: <input type="text" id="username" name="username"><br><br> Password: <input type="password" id="password" name="password"><br><br> <input type="submit" value="Submit"> </form> </body> </html> Your index.html file should look something like this: 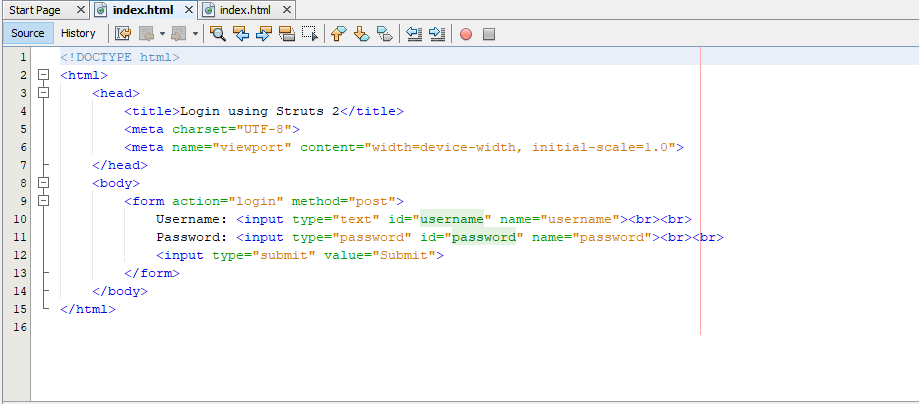
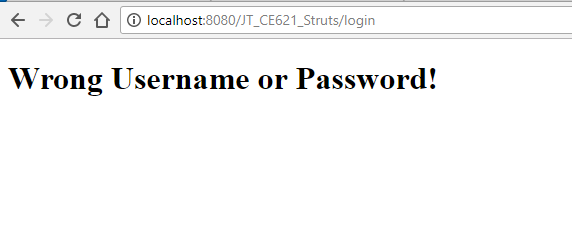
<h1> Wrong Username or Password!</h1> Your error.jsp page should look like this: 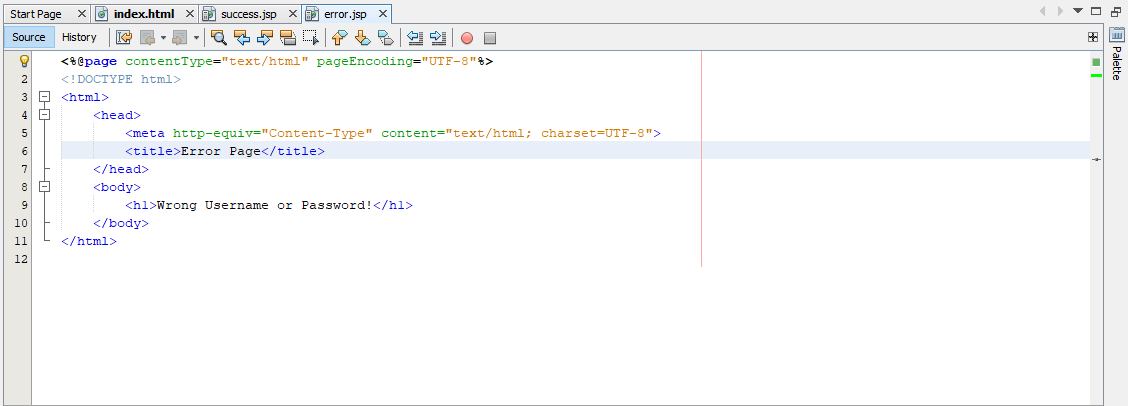
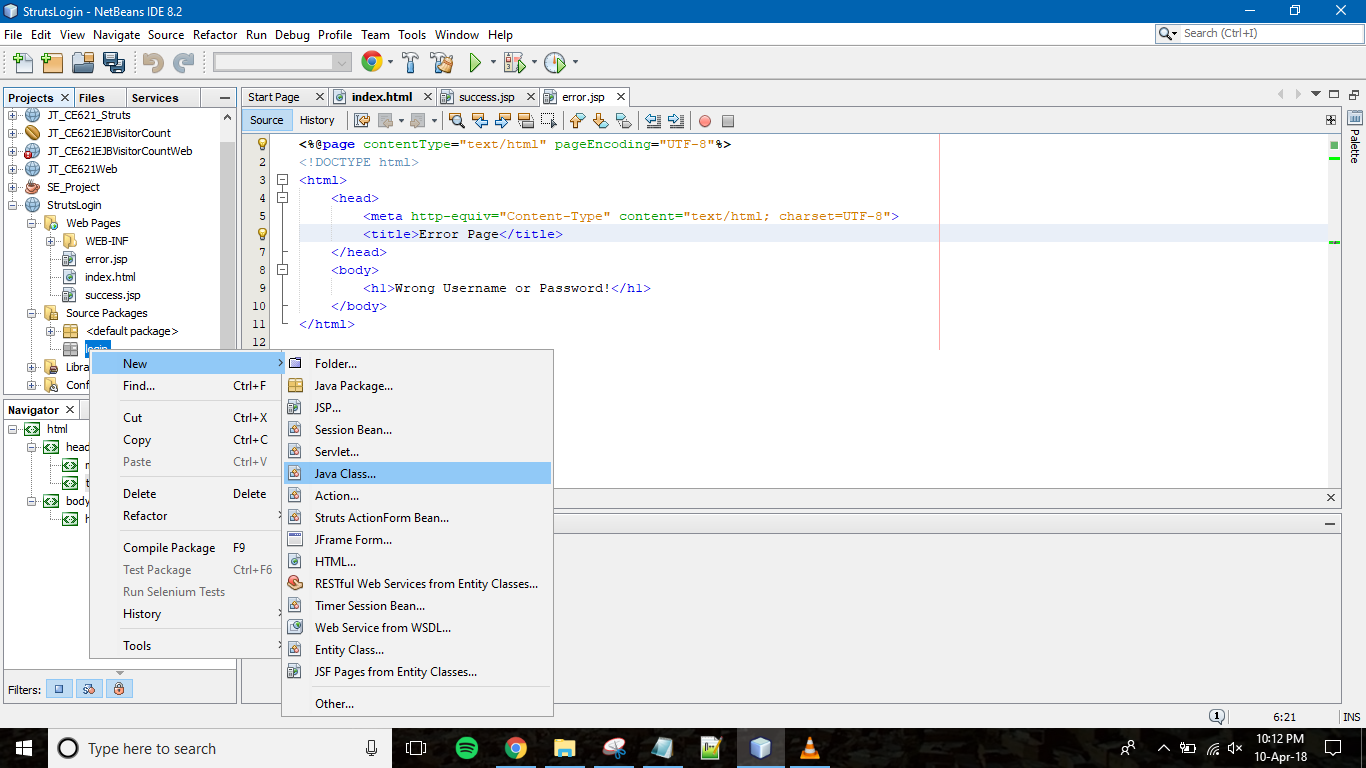
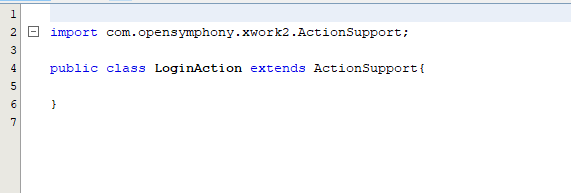
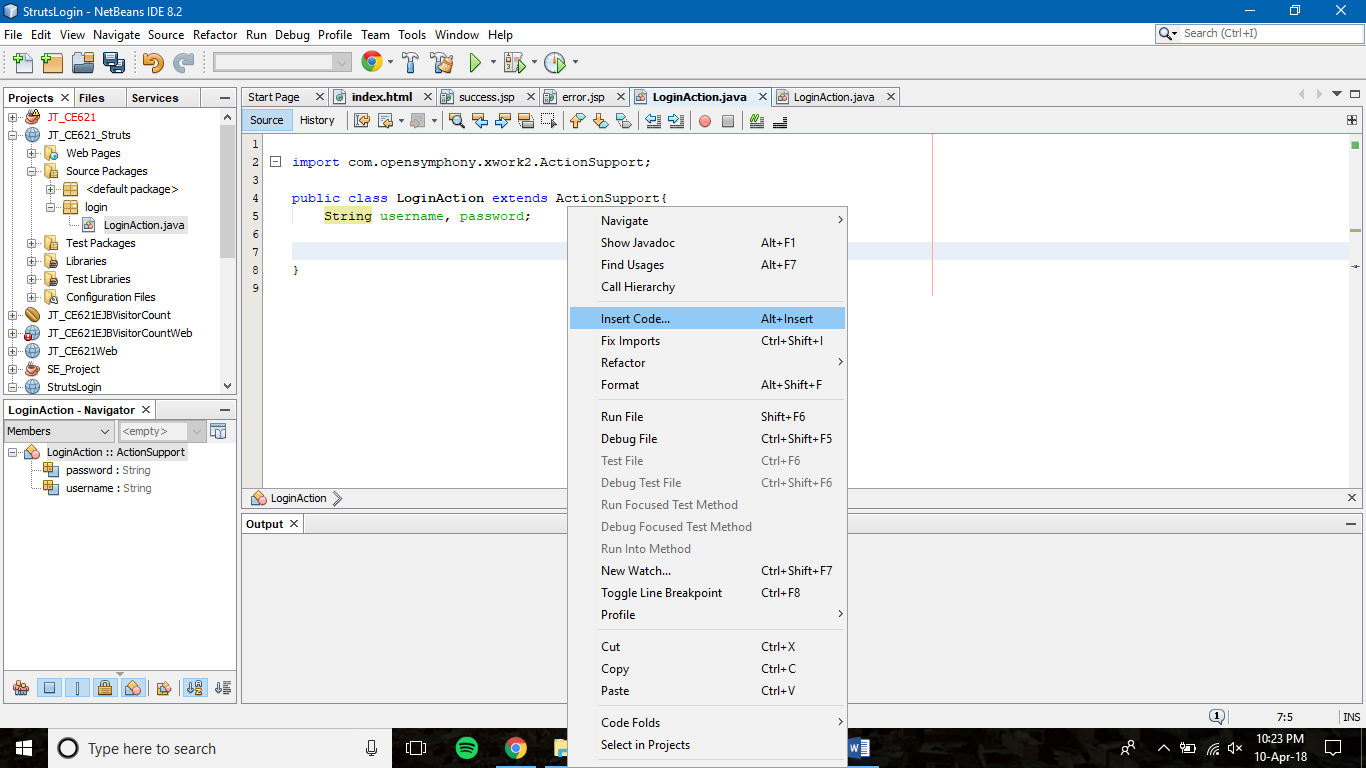
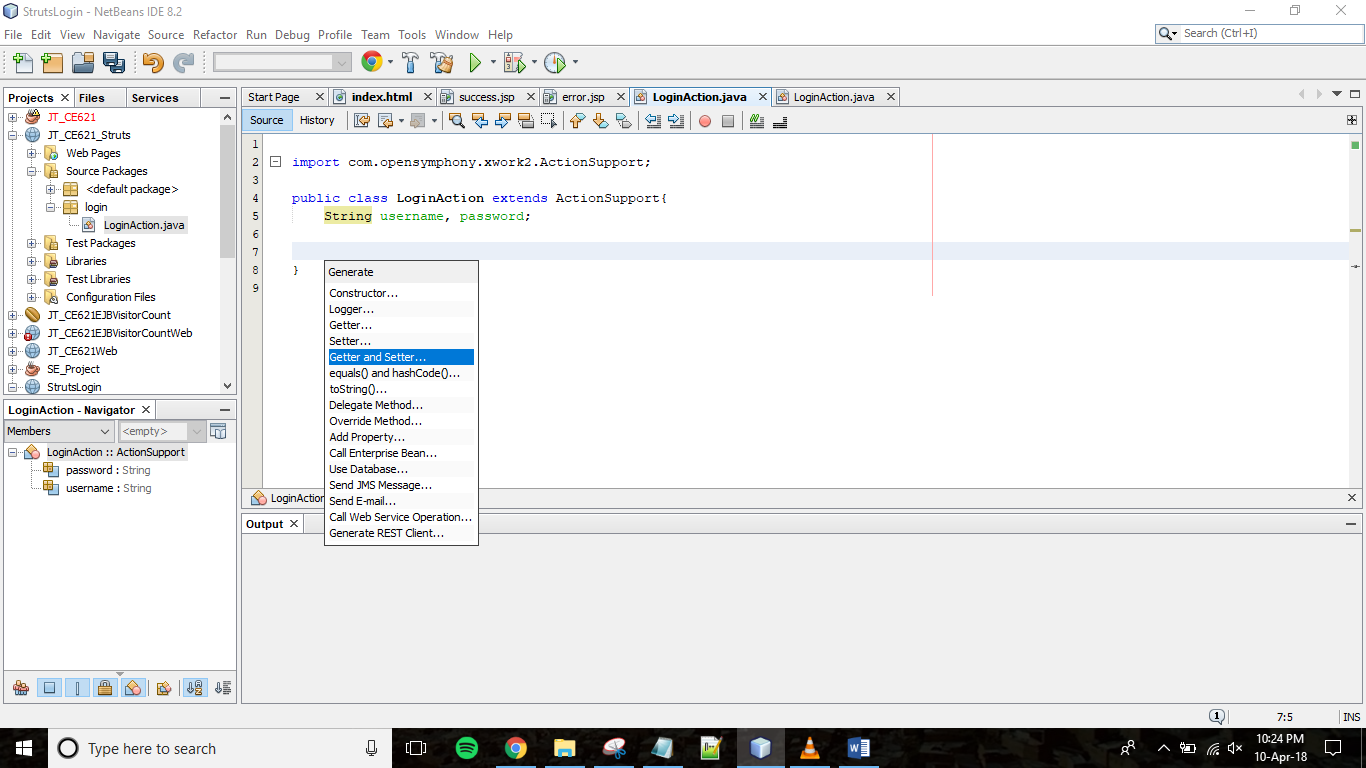
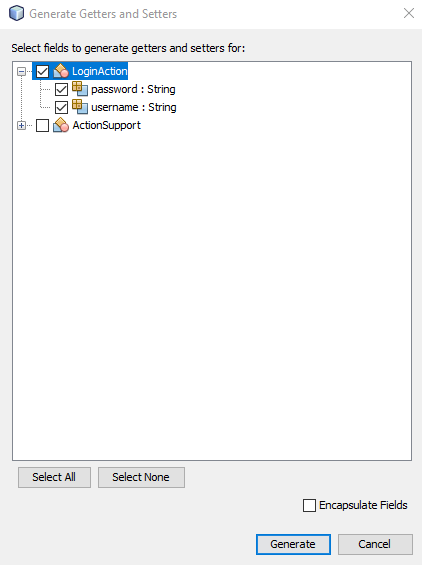
String username, password;
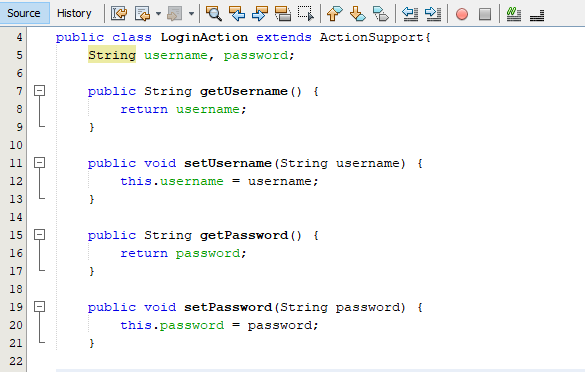
public String execute(){ if(username.equals("universe") && password.equals("galaxy")){ return "SUCCESS"; }else{ return "ERROR"; } }
<action name="login" class="login.LoginAction"> <result name="SUCCESS">/success.jsp</result> <result name="ERROR">/error.jsp</result> </action> So if the execute() function returns value "SUCCESS" then struts.xml will redirect to success.jsp else it'll redirect to error.jsp. Your struts.xml file will look like this. 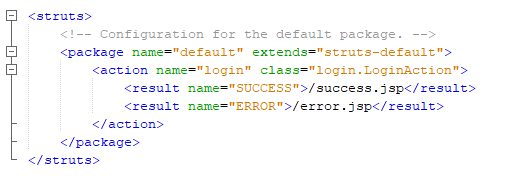
<%@taglib uri="/struts-tags" prefix="s" %> in the top just after the <%@ page contentType="..... %>.
<h1>Hello <s:property value="username"/>!</h1> <s:property value="username"/> will fetch the name the user had entered in the username text-field during login. 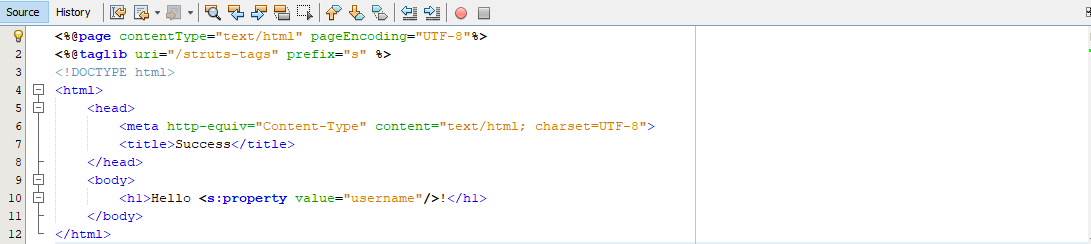
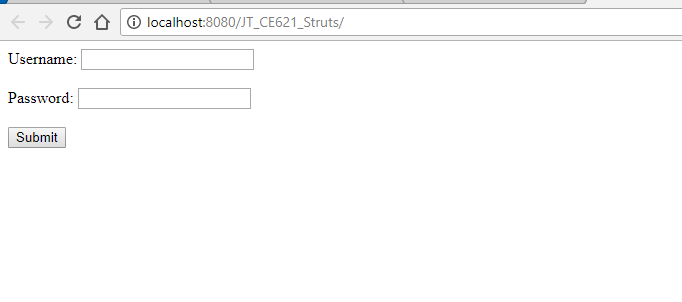
You're all ready now. Compile and run index.html using Shift + F6. The following page will open:
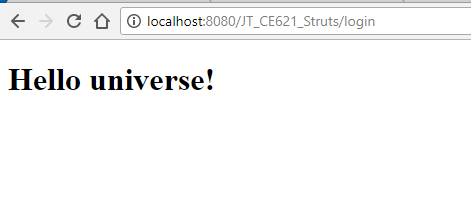
When I enter the correct details, I am greeted with success.jsp.
Whereas, when I enter the wrong details, I get the error.jsp page.
This was a basic login page. You can add CSS, JavaScript, jQuery, etc. to add more functionalities and features to your page.
That's it. An easy way to implement a login page using Struts 2 in NetBeans. NOTE: You can access the entire code here. Try it out yourself and let me know about any errors or doubts you may have in the comments section below.
|
Archives
December 2018
Categories
|
 RSS Feed
